WordPress is widely recognized as the world’s most popular website builder, powering over 43% of all websites online. One of the key reasons for its popularity is how easy WordPress is to install, allowing virtually anyone to build a website quickly.
Most leading WordPress hosting companies offer a simple, one-click installation process. In most cases, setting up WordPress takes under five minutes, making it highly accessible.
In this tutorial, we aim to provide a complete WordPress installation guide for both beginners and advanced users.
For beginners, we’ll walk you through installing WordPress on top hosting platforms using 1-click install tools like Fantastico, Softaculous, and QuickInstall.
We’ll also cover manual installation via FTP for intermediate users.
Lastly, for beginner developers and designers, we’ll demonstrate how to install WordPress on a local machine (Windows, Mac, and Linux).
In addition to installation, we’ll share essential tips on what to do after setting up WordPress.
Things You Need Before Installing WordPress
Before you can install WordPress, you’ll need a domain name and a reliable web hosting provider with expertise in WordPress hosting.
We strongly recommend using Bluehost, as they are one of the largest hosting providers worldwide. Additionally, they are an officially recommended WordPress hosting partner.
Even better, Bluehost offers a free domain and 60% off their hosting plans (exclusive for LorePearl users).
Once you’ve selected a hosting provider, you’re ready to install WordPress. Use the quick links below to jump to the installation method you prefer.
How to Install WordPress on HostGator
HostGator is a well-known shared WordPress hosting provider that is especially popular among beginners. They make it incredibly easy to install WordPress in just a few clicks.
To start, log in to your HostGator hosting account dashboard. Once you’re in, click on the ‘QuickInstall’ icon located in the ‘Software’ section.

On the following screen, select ‘WordPress’ to launch the installation wizard.

You will then be prompted to choose the domain name where you’d like to install WordPress and specify a directory path.
Most beginners prefer to install WordPress at the root of their domain name (for instance, lorepearl.com). In that case, simply leave the directory field blank.
Click the next button to proceed.
The installer will then ask you for details about your WordPress site. You’ll need to provide a site title, an admin username, your first and last name, and an admin email address. Ensure you have access to this email, as it’s where you will receive your WordPress password reset email.

How to Install WordPress using Softaculous
Softaculous is a widely used auto-installer script that makes it simple to install popular web applications like WordPress with just a few clicks. Hosting providers such as SiteGround and InMotion Hosting incorporate Softaculous into their control panels.
To get started, log in to your cPanel account and look for the Softaculous or WordPress installer icon, usually found under the Auto Installers section.

Clicking either of these icons will launch the Softaculous auto-installer for WordPress. You’ll first see an overview of WordPress, and you’ll need to click on the Install tab to proceed.
Softaculous will then prompt you to choose where you want to install WordPress. You need to select either http:// or http://www. as the protocol.
If your site uses SSL and HTTPS, you should choose https:// or https://www. as the protocol.
Next, you’ll need to select the domain name where you wish to install WordPress. Most users prefer to install WordPress in their domain’s root directory, like example.com. In this case, ensure that the ‘In Directory’ field is left blank.
Scroll down a bit, and you will find the site settings section.
In this section, you should first provide a title and description for your WordPress site. Don’t worry—you can easily modify these from your WordPress admin area after installation.
Next, you’ll need to create an admin username, password, and email address. Softaculous will automatically populate the username and password fields with a strong, non-dictionary word for the username and a robust password.
You can modify these to something more memorable for yourself, but we strongly recommend that you always use a strong password. Check out our guide on effectively managing passwords for WordPress beginners to learn how to handle strong passwords easily.
Make sure to enter the correct email address in the admin email field, as this is where WordPress will send notifications and a password reset link if you forget your password.
The remaining options on the screen are optional. Once you’re ready, click the install button to run the installer.
Softaculous will begin the installation using the settings you specified. A progress bar will display the installation status, which may take a couple of minutes. Do not close the window until the progress bar reaches 100%, as doing so could affect your WordPress installation.
You’ll see a success message once the installation is complete, along with links to your website and your WordPress admin area.
How to Install WordPress on WP Engine
WP Engine is the leading provider of managed WordPress hosting. A managed hosting account acts like a concierge service for your WordPress website.
They handle everything from WordPress site updates and installation to performance optimization, allowing you to focus on growing your business.
As a managed WordPress hosting provider, WP Engine automatically installs WordPress when you sign up. Depending on your hosting plan, you can also create additional websites as needed.
To get started, log in to your WP Engine dashboard and navigate to the ‘Sites’ page. Here, you’ll see a list of all your WordPress installations. Click the ‘Create Site’ button to add a new WordPress installation.

On the next screen, you’ll be prompted to provide a name for your production environment. Choose a name that helps you easily identify the website, then click the ‘Create Environment’ button. WP Engine will now set up your WordPress environment, which may take a little time for DNS changes to propagate.
Once complete, you can access the WordPress admin area by clicking the link in the sidebar. Your login credentials will also be displayed on the same page.

To add a domain to your site, click on the ‘Add Domain’ link. Since WP Engine is not a domain registrar, you will need to point your domain’s DNS settings to WP Engine.
To do this, you will need your site’s IP Address and CNAME. This information is available on your site’s overview page.

Now, let’s guide you through entering this information in Domain.com. The process is similar for most domain registrars; you’ll just need to locate the DNS settings.
Log in to your Domain.com dashboard and click on the DNS and Nameserver settings for your domain.

On the following screen, first locate the A record with the @ symbol in the name field. Click ‘Edit’ to modify its settings.

Next, enter the IP address provided by WP Engine as the value for this record, and click ‘Update DNS.’

Afterward, check if you have a CNAME record with ‘www’ in the name field. If you do, edit that CNAME record. If not, click on the ‘Add DNS Record’ button.

Enter the CNAME subdomain provided by WP Engine into the value field, then click ‘Add DNS.’
That’s it! You’ve successfully pointed your domain name to your WordPress site hosted on WP Engine.
How to Install WordPress on SiteGround
SiteGround is a top choice for WordPress beginners, thanks to its outstanding WordPress support and highly optimized hosting packages. It offers a simple process to install WordPress directly from your hosting account. Once logged into the SiteGround hosting dashboard, navigate to the ‘Websites’ section to begin.
Then, proceed by clicking the ‘New Website’ button to start setting up your site.

If you haven’t secured a domain yet, simply click on ‘New Domain’ and search for the domain you’d like to register.
If you already own a domain, select ‘Existing Domain’ and proceed.

On the following screen, enter the domain name you’d like to use.
Next, click the ‘Continue’ button to move forward.

You’ll then arrive at a page where you can choose to start a new website.
Select ‘WordPress’ as your preferred software by clicking on it.

How to Install WordPress using Fantastico
Fantastico is an auto-installer script provided by various WordPress hosting companies. It works similarly to other installer tools in this guide and offers a quick and easy method to install WordPress.
To get started, log in to your cPanel dashboard, scroll down to the software and services section, and locate the Fantastico icon.

Clicking the Fantastico icon will open the auto-installer script.
Some hosting providers may still be using an older version of Fantastico. In this guide, we will showcase screenshots from Fantastico F3.
If the version of Fantastico on your host looks different, don’t worry. The core installation steps remain the same, so you can easily follow along.
On the main Fantastico screen, you’ll see a list of web applications on the left. Click on Blogs, and you will find WordPress listed among the available options.
Clicking on WordPress will provide an overview of the software and the ‘Install’ button.

Simply click the ‘Click here to install WordPress’ button to proceed.
Fantastico will now ask you to configure your installation settings. First, select the domain where you’d like to install WordPress.

If you wish to install WordPress in a sub-directory, enter the sub-directory name in the appropriate field. Otherwise, leave it blank.
Under the ‘Administrator Details’ section, provide your admin user information, including a username, password, and email address for your WordPress account.
Click the Submit button to proceed.
Fantastico will now complete the installation of WordPress. Once the process is finished, a success message will appear.
How to Install WordPress from cPanel
cPanel is a widely-used software offered by many web hosting providers. It gives website owners an easy-to-use, web-based interface to manage their hosting accounts efficiently.
Through cPanel, you can access various tools, including auto-installer scripts that simplify WordPress installation.
Hosting providers decide which auto-installer scripts to offer. Softaculous, QuickInstall, and Fantastico are among the most commonly chosen options.
In this guide, we’ll demonstrate how to install WordPress using each of these auto-installers. Simply follow the steps based on the auto-installer available in your cPanel dashboard.
How to Install WordPress using QuickInstall
QuickInstall is another widely-used auto-installer, available through hosting providers like HostGator and others. In this guide, we’ll be using HostGator’s cPanel dashboard for the screenshots, but if you’re using another host with QuickInstall, the steps will be quite similar.
To begin, log in to your hosting account’s cPanel dashboard. Scroll down to the Software section and click on the QuickInstall icon.

This will take you to QuickInstall’s 1-Click Installers page, where you’ll see installation options for popular web applications, including WordPress. Click on WordPress to start the installation process.

The installer will show an overview of WordPress. From the drop-down menu, choose the domain where you want to install WordPress.
Most users prefer to install WordPress on the root of their site, such as lorepearl.com. If that’s the case, leave the directory field empty.

Next, click the button to proceed. You’ll be prompted to enter your WordPress details, including a username, email address, and site title.

Once you’ve filled in all the required information, click the Install button.
QuickInstall will now complete the WordPress installation. When it’s finished, you’ll see a success message with your login details, including your username and password.

You can now click the ‘Login’ button to access your WordPress admin area.
That’s it! You have successfully installed WordPress using QuickInstall.
How to Install WordPress on Bluehost
Bluehost is one of the largest hosting providers globally, and they have a deep understanding of WordPress, making their installation process incredibly beginner-friendly.
When you sign up with Bluehost, WordPress is automatically installed on your chosen domain name.To set up a new WordPress site, simply navigate to the ‘My Sites’ tab in your Bluehost dashboard. Then click the ‘Add Site’ button and choose ‘Create New Site.’

This will open the Bluehost WordPress installation wizard, guiding you through the process step by step.
First, you’ll be prompted to enter a site title and an optional tagline.

Click the ‘Next’ button to proceed.
Next, Bluehost will ask you to select a domain and path for your site. If you already have a domain name, select it from the dropdown menu.

If you don’t have a domain yet, you can purchase one via the ‘Domains’ page in your Bluehost dashboard.
Once you’ve selected your domain, you can leave the directory path blank, and Bluehost will automatically assign it. The installer will also suggest some essential WordPress plugins you might want to install.
Click the ‘Next’ button to continue.
The installer will now begin setting up your WordPress website, which should take just a few moments. Afterward, you’ll see a confirmation message with details about your new site.

Bluehost will also send this information to your email address.
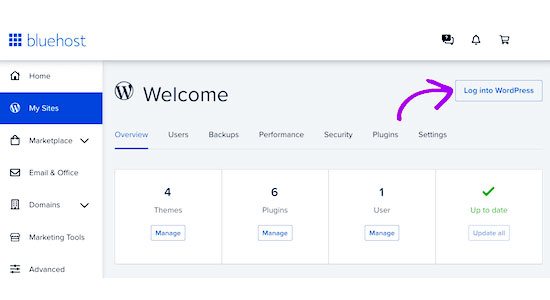
To log into your new site’s admin area, return to the ‘My Sites’ tab in the Bluehost dashboard, locate your site, and click the ‘Manage site’ button.

On the following screen, simply click the ‘Log into WordPress’ button.
You’ll now be directed to your site’s WordPress admin dashboard
Congratulations! You’ve successfully installed WordPress on your Bluehost hosting account.
How to Install WordPress using FTP
Manually installing WordPress is often referred to as the well-known 5-minute install. It involves a few extra steps and requires an FTP client to complete the installation manually.
Check out our beginner’s guide on using FTP to upload WordPress files for more details.
The first step is to download the latest version of WordPress.
The WordPress package comes as a Zip file. After downloading, unzip the file, and inside, you’ll find a WordPress folder. This folder contains all the essential WordPress files that you’ll need to upload to your web server.

Now, connect your FTP client to your hosting server. Once the connection is established, use the FTP client to transfer the WordPress files from your computer to your website’s server.

If you want to install WordPress on your root domain (like example.com), upload the WordPress files to the root directory of your site, usually named /public_html/.
Alternatively, if you prefer to install WordPress in a subfolder (like example.com/blog), upload the files to the /public_html/blog/ directory.
After uploading WordPress, go to your hosting control panel to create a database. We’ll demonstrate how to do this using cPanel. If your host uses a different control panel, simply look for the MySQL databases option—the rest of the process should be fairly similar.
From the cPanel dashboard, click on the ‘MySQL Databases’ icon.

You’ll see a field where you can create a new database. Enter a name for your database and click on ‘Create Database.’

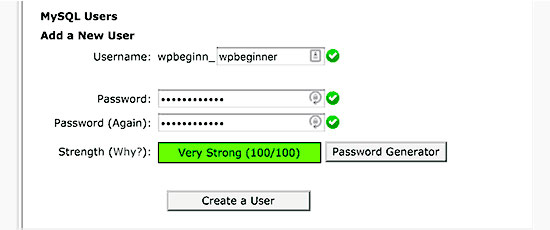
Now that your database is set up, you’ll need a MySQL username with access to manage it.
On the MySQL Databases page in your cPanel, scroll down to the MySQL Users section. Enter a username and password for your new user and click the ‘Create a user’ button.
This user doesn’t yet have access to the database you created. To grant them permissions, scroll down to the ‘Add User to a Database’ section on the same MySQL Databases page. Select the user you created from the dropdown menu, then choose your database, and click the add button.

Next, you’ll be prompted to assign privileges for the user. Select all privileges and click the ‘Make changes’ button.
Your MySQL database and user are now ready. Be sure to note down your database name, MySQL username, and password, as you’ll need this information shortly.
Now, go to the URL where you uploaded WordPress. If it’s installed on the root domain, simply type your domain name into the browser, like yoursite.com or www.yoursite.com.
You’ll be greeted by a language selection screen. Choose your preferred language for the rest of the installation process, or select English and change it later if needed.

Click the continue button to move forward.
You’ll now be presented with a set of installation instructions. Essentially, WordPress will inform you that it requires your database name, password, and MySQL host details to complete the installation.

Click the ‘Let’s go’ button to proceed.
WordPress will now display a form where you’ll need to input the database information you set up earlier.

Fill in the information and then click on the ‘Submit’ button. WordPress will connect to your database and show you a success message.

Click the ‘Run the Install’ button to proceed.
WordPress will now create the necessary tables in your database and move you to the next step of the installation process.
Here, you’ll need to provide some key information for setting up your site, including the site title, username, password, and admin email address.
If you don’t want search engines to index your site right away, check the box next to search engine visibility. You can always adjust this setting later in WordPress. If you’re unsure, it’s safe to leave it unchecked for now.

Click the ‘Install WordPress’ button to proceed. WordPress will now set up your site and complete the installation process.
Once finished, you’ll see a success message displaying your username. You can then click the ‘Log in’ button to access your WordPress site and begin managing it.

How to Install WordPress on your Computer
Many of our readers ask whether they can install WordPress on their local Windows, Mac, or Linux computer. The answer is yes, but for most beginners, installing WordPress locally isn’t necessary.
A local website is hosted on your computer rather than the internet. It’s ideal if you want a private environment to develop WordPress themes, plugins, or experiment with different features.
However, if you want others to access your blog, installing WordPress on your computer isn’t the way to go. Instead, you should purchase web hosting and follow one of the installation methods we discussed earlier.
That said, if you do want to create a private WordPress site for testing, we recommend using Local by Flywheel. This local development tool allows you to install WordPress on your Windows, Mac, or Linux machine with just a single click.

After installing WordPress locally, you’ll have full access to the admin area, which functions just like any other WordPress site. From here, you can install plugins, switch themes, and explore different WordPress features.
At some point, you may want to make your local website live so others can access it. The good news is that moving WordPress from a local server to a live site is straightforward.
For more details, check out our guide on how to install WordPress locally on Windows or Mac.
How to Install WordPress in your Language
Just like on Windows, Mac, iPhone, and Android, you can use WordPress in your preferred language.
WordPress supports numerous languages, including English, Spanish, French, Arabic, Korean, German, Hebrew, Hindi, Japanese, Vietnamese, Chinese (Simplified), Portuguese, and many more.
You can select a language during the WordPress installation process, or change it later by navigating to the Settings » General page in your WordPress admin dashboard.

For more information, check out our article on how to install WordPress in different languages.
WordPress is also commonly used to build bilingual and multilingual websites. See our tutorial on how to effortlessly create a multilingual WordPress site using TranslatePress.
How to Install a WordPress Multisite Network
WordPress includes built-in multisite functionality. This feature allows you to create multiple WordPress sites using a single WordPress installation. It can automatically generate new sites as sub-domains or in sub-folders.
This setup is ideal for businesses, non-profits, or governments that need sub-sites for different locations or regions. Many educational institutions also use the WordPress multisite network to give students the ability to create their own blogs.
Setting up a multisite network can be a bit complex, but we’ve created a detailed step-by-step tutorial on how to install and configure a WordPress multisite network.
Things to do After Installing WordPress
Now that you’ve successfully installed WordPress, here are a few things to help you get started with your new site.
Choosing a Theme
The visual design of your WordPress site is controlled by Themes. With thousands of WordPress themes available, it can be overwhelming for beginners to choose the right one. That’s why we’ve created a guide to help you select the perfect theme for WordPress.
We regularly feature collections of themes we recommend in our Showcase section. Here are some of our most popular theme showcases.
Installing and Using WordPress Plugins
The true strength of WordPress lies in its extensive collection of plugins. These plugins act like apps for your WordPress site, enabling you to enhance functionality and introduce new features.
There are over 59,000 free plugins available in the WordPress plugin directory, with even more options offered as paid plugins on third-party websites.
If you’re unsure which plugins to install, check out our expert recommendations for essential WordPress plugins suitable for all websites. You may also want to explore the plugins we use on this site by referring to our LorePearl blueprint.
Additionally, we have a beginner-friendly step-by-step guide on how to install WordPress plugins.
Start Learning WordPress
WordPress is the most user-friendly CMS available today, with millions of people worldwide utilizing it daily. However, you might occasionally need a bit of assistance.
This is where LorePearl comes in. We are the largest free WordPress resource site globally, consistently publishing tutorials and guides tailored specifically for bloggers and small businesses.
Here are some valuable resources you can find on LorePearl (all completely free).
- WordPress Pearl – The central place for all our WordPress tutorials and guides.
Conclusion
We hope this tutorial on installing WordPress has helped you learn how to set it up easily. You may also want to check out our list of 40 useful tools designed to assist you in managing and growing your WordPress site.
If you enjoyed this article, consider subscribing to our YouTube Channel for WordPress video tutorials. You can also connect with us on Twitter and Facebook.